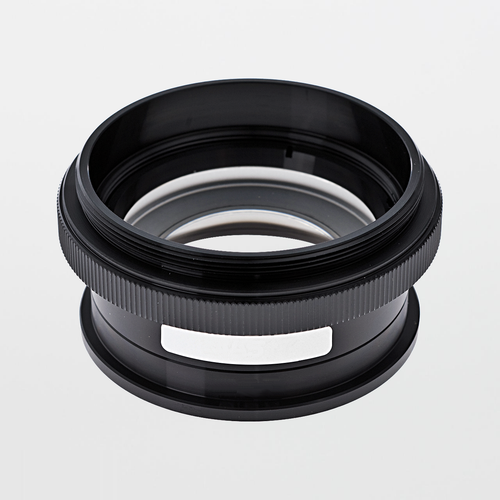
Meiji MA546 Auxiliary Lens for EMZ-10 (0.5X / W.D. 194mm)

$190.00
(No reviews yet)
SKU:
MA546
Availability:
7 - 10 Business Days
Shipping:
Calculated at Checkout

Meiji MA546 Auxiliary Lens for EMZ-10 — 0.5X Magnification, 194mm Working Distance

The Meiji MA546 is a 0.5X auxiliary (supplementary) lens designed for Meiji EMZ-10 configurations. It is typically selected to increase working distance and improve clearance for hands-on inspection—especially when operators need room for tools, tweezers, fixtures, and gloved manipulation under the objective. With a published working distance of 194mm, MA546 is a balanced “clearance + usability” option for scan-and-handle benches where 1.0X (or higher) configurations feel cramped.

Quick selection note: MA546 (0.5X) is commonly chosen when you want more clearance without going to the lowest-factor option. Because it is <1X, it typically reduces effective magnification while increasing working distance—ideal for “scan + handle” stations.

Specifications:
  • Accessory type: Auxiliary lens (auxiliary objective / supplementary lens)
  • Magnification factor: 0.5X
  • Working distance (W.D.): 194mm
  • Primary compatibility: EMZ-10 (also referenced for Z-7100 / EMZ-10H in manufacturer literature; confirm to your microscope body)
  • Mounting: Auxiliary lenses are typically installed by threading onto the objective interface below the microscope head (system dependent)
  • Program note: Eyepieces are ordered as a matched pair; illumination and stand selection determine overall ergonomics and performance
Where MA546 Fits in Cleanrooms and Laboratories (and Why)

MA546 is a strong fit for cleanroom inspection stations and production QC benches where operators must work under the objective (reposition parts, use tweezers, manipulate fixtures) without colliding with the optics. In practice, increased working distance reduces accidental contact events and makes station behavior easier to sustain across shifts—especially when gloves, sleeves, and ESD-safe tools are part of the workflow.

Typical program fit: scan + handle benches, incoming inspection, packaging checks, assembly/rework support, and general QC screening where clearance is a primary constraint.

Best practice is to separate roles: use MA546 (clearance-first) for scanning/handling, and keep a higher-detail “confirm” station for borderline calls where discrimination is the limiting constraint.

MA546 Features:
  • 0.5X auxiliary lens engineered for EMZ-10 platform configurations
  • 194mm working distance supports tool/fixture clearance and improved ergonomics
  • Designed for scan-and-handle workflows where operator access under the objective is critical
  • Supports modular system “engineering” (swap lens factor to tune clearance vs. detail)
MA546 Benefits:
  • Improved clearance: more space for tools, fixtures, and gloved handling under the objective.
  • Higher throughput: fewer repositioning cycles and less “fighting the optics” during manipulation-heavy inspection.
  • Better ergonomics: increased working distance can reduce operator fatigue and stabilize inspection behavior.
  • Cleaner workflows: reduced contact events help support cleanroom station discipline (covers, wipe-downs, controlled handling).
Common Applications:
  • Handling-heavy inspection (tweezers, fixtures, gloved manipulation)
  • Incoming inspection and scan workflows where coverage and access matter
  • Assembly/rework benches requiring clearance for tools under the objective
  • General QC screening where a separate confirm station handles borderline calls
Selection Notes (0.5X vs. 0.4X vs. 0.75X vs. >1.0X)
  • 0.5X (MA546 / 194mm W.D.): balanced clearance-first option for scan + handle benches.
  • 0.4X (e.g., MA558 / 247mm W.D.): maximum clearance where access is the dominant constraint.
  • 0.75X (e.g., MA547 / 127mm W.D.): more detail with moderate clearance when manipulation is still required.
  • >1.0X: confirm/detail configurations where discrimination is the limiting constraint (clearance decreases).
Optics Cleaning (Recommended for Scan/Handle Benches)

Handling-heavy inspection increases the chance of airborne deposition and film residues on optics. Maintain contrast and reduce inspection noise using optical-grade swabs and specialty low-lint wipers engineered for coated glass.


Link to Meiji MA546 Product Details / Datasheet:
Manufacturer Product Page | Datasheet (PDF)

Related Products Available From SOSCleanroom.com

Notes: Treat auxiliary lens factor as a configuration-controlled input. If benches use different lens factors, the same part will appear at different apparent size and coverage—driving inspection inconsistency.

Product page updated: Jan. 21, 2026 (SOS Technical Staff)

© 2026 SOS Supply. All rights reserved.

The Technical Vault
By SOSCleanroom
Last reviewed: Jan. 21, 2026 | Audience: cleanroom operations, QA/QC, lab managers, manufacturing engineering, EHS
The “Middle Ground” Auxiliary Lens: Why 0.5X Often Stabilizes Scan-and-Handle Stereo Microscopy
Meiji MA546 — 0.5X factor, 194mm working distance, and how to prevent configuration-driven inspection drift
Clearance-first configuration Scan vs confirm benches Stereo vs compound education
The one-paragraph answer

The Meiji MA546 is a 0.5X auxiliary (supplementary) lens used on EMZ-10 platform configurations to increase working distance—published at 194mm. Operationally, MA546 is a clearance-first tool that supports scan-and-handle benches where operators need room for fixtures and manipulation under the objective. The tradeoff is that <1X lenses typically reduce effective magnification, so programs perform best when MA546 benches are paired with a separate confirm station for borderline calls.

Program success rule: Treat lens factor as a controlled station setting. If different benches run different factors, inspection outcomes drift—even when the product is identical.

Operational problems MA546 is solving
  • Tool/fixture collisions: insufficient clearance under the objective forces awkward manipulation and slows cycle time.
  • Contact events: cramped benches increase accidental touch risk (optics, parts, work surface), especially in cleanrooms.
  • Operator fatigue: tight spacing drives posture strain and inspection variability over long shifts.
  • Throughput limits: excessive repositioning to “fit” the part under the optics reduces output.
Microscopy education: stereo microscope engineering vs. compound microscope engineering

Stereo microscopes are engineered for inspection and manipulation. Dual optical paths provide depth perception, and the platform is modular by design—stands, illumination, eyepieces, and auxiliary lenses are used to tune a station to the dominant constraint (clearance, coverage, or discrimination).

Compound microscopes are typically optimized for higher magnification analytical viewing (often slide-based) using a single optical axis and transmitted illumination. Their architecture prioritizes objective/condenser performance and alignment over tool clearance—excellent for analytical microscopy, but not the default solution for hands-on manipulation workflows.

Why this matters: MA546 is not “more power”—it is more clearance. Treat it as a workflow-enabling configuration, not a defect-discrimination configuration.

Best-practice bench model: scan/handle station + confirm station

Programs stabilize when benches are assigned roles. Use MA546 scan/handle benches for coverage, orientation, and manipulation. Then route borderline or defect-critical calls to a confirm bench configured for higher discrimination. This reduces false rejects/accepts and prevents decision drift caused by configuration mismatch.

Configuration control checklist (SOP-ready)
  • Microscope body model (EMZ-10 series)
  • Auxiliary lens factor installed (MA546 0.5X)
  • Eyepiece model/magnification (pair-matched)
  • Stand type + working height (documented)
  • Illumination type + standard settings (reduce glare artifacts)
  • Optics cleaning method and interval (documented)
Optics hygiene discipline (artifact control)

In handling-heavy inspection, optics haze and film residues can be misread as defects. Implement an optics-care routine using optical-grade swabs and low-lint wipers, and avoid reusing loaded cleaning surfaces.

Suggested optics-cleaning SOP insert (template-style)
  1. Remove loose particles before wiping to avoid dragging grit across coated optics.
  2. Use a fresh optical swab/wiper; lightly dampen with minimal approved solvent.
  3. Wipe gently in one direction; avoid heavy pressure and repeated scrubbing.
  4. Replace the cleaning surface frequently; do not reuse loaded swabs/wipers.
  5. Cover the microscope when idle to reduce airborne deposition.
Source basis
  • SOSCleanroom product listing context (application positioning and bench workflow language).
  • Manufacturer MA546 product page and datasheet (0.5X factor and 194mm working distance).
  • Common inspection microscopy best practices: scan vs confirm station design, configuration control, and optics hygiene discipline.
Compliance note: This Technical Vault article is provided for educational support. Always follow facility SOPs, QA requirements, and validation/qualification plans.
Document control: Rev. Jan. 21, 2026 (SOS Technical Staff)
© 2026 SOS Supply. All rights reserved.